Thursday, November 27, 2008

Happy Thanksgiving!

To each and everyone of you I would like to wish you a Happy Thanksgiving. I am thankful for so many blessings in my life, but mostly grateful to share those blessings with family and friends.

Sunday, November 23, 2008

This one takes the cake!

What a fun way to give an ordinary gift card! The base of the "cake" is a pre-made box purchased in the craft store. They come in all sorts of shapes and sizes. I covered it with paper, ribbons and buttons. On the lid I added lots of glitter and the flower shapes are from those "Dazzling Die Cuts". The cake stand was assembed from pieces of cardboard and styrofoam also covered in paper, cardstock and ribbons. The large pink scallops were punched out from one of the dazzling die cut sheets, and glued on. How easy is that! Once everything was decorated I attached it all together with a hot glue gun. The birthday girl simply lifted the lid of the "cake" to reveal a gift card and yummy chocolates.


Here's the birthday girl with my daughter after receiving her cake!


Friday, November 21, 2008

New Checkbook Cover

Tis' the Season for shopping, and my checkbook cover needed an update. I made one a few years back and it was really looking rough. So I made a new one using some current products from Close To My Heart. It's so nice and pretty now, maybe writing checks will be more fun.... yeah right!


Thursday, November 20, 2008

Happy Fall

Just a simple card for Fall. I'm trying to get into the spirit of the season, but the weather is not cooperating at all. It's been so warm here lately that I can't believe we'll be eating Turkey Dinner next week.
The pumpkin on this card is from the October Word Puzzle stamp and I embossed the background with the pumpkin vine cuttlebug embossing folder.
I will have more fun artwork to post very soon. I have been working hard, but unfortunately was not able to "reveal" the cool gift until the Birthday Girl receives it first!

Tuesday, November 11, 2008

December Word Puzzle Pages

These are the Word Puzzle pages for December. I can't believe we've reached the end of the year and the end of our Word Puzzle Club. For these Holiday pages I pulled in non-traditional "Christmas" colors. I got the inspiration from the Reflections book and from a page I did in my own scrapbook last year.

We always receive such lovely cards and photo's from friends and family that I would hate to lose. So my remedy was to create a page with a large pocket to hold all of those precious cards and pics. I especially love the photo postcards. Last year we had some that pictured the year in review, photo's in front of the Christmas tree, kids on quads and silly faces too! Can't wait to see what we receive this year. These are the memories that make my heart happy and I want to preserve them for years to come.


The title was made using the Friendship Alphabet. The snowflake is a Martha Stewart punch, and the scallop border is a Fiskars punch. All other items are Close To My Heart.


Hinges aren't just for opening tabs or photo's. You can use them as an embellishment with brads or you can even string thread or ribbon through the openings too!


Club members will also get to make these simple cards to fill their pockets.

Love and Praise

I had some scraps left over from another project I was working on so I decided to get out September's Stamp of the Month again. It's a beautiful stamp set and I did not have the opportunity to fully explore with it. I used more of the new colors too, there just so nice and soft for Autumn. The phrase is from Treasure Life also, but would you believe the bird is from a Christmas stamp; Festive Frills. I added some layers and fun embellishments, not bad for using some left over papers.


Monday, November 10, 2008

Festive Frills

Festive Frills was my first "must-have" holiday stamp from the current Idea Book. This card features the wreath and is layered with lots of dimension. Enjoy!

Thursday, November 6, 2008

Out of the "gift" box!

Just a fun card I made while thinking out-of-the box. I wanted to create a Christmas card with non-traditional paper and stamps. The paper I used is actually from Perfect Day Simply Snapshots (close to my heart). With some clever cutting you can use these papers on a card base. The sassy shopper is from a stamp set that was a promotion a couple months back. I simply stamped her and did some paper piecing to achieve the differently wrapped packages. I added some scallopping and ribbon. The final touch was the sentiment of course. It's one of my favorite lines, from one of my favorite Christmas stories, The Grinch! Try using a non-traditional Christmas stamp or papers for one of your Holiday projects.

Tin O' Tiny Ornaments


I found these paint cans at my local hardware store for .99 cents. I used CTMH Evensong papers to cover the outside and the lid. Then using a Martha Stewart snowflake punch and red Stickles I decorated all around the outside. The tag was made using the December Word Puzzle stamp set. The scallop ornament was made with a punch, some floss and a small button. On the frame I simply left an opening at the top of the cardstock and texture paper so that a photo can easily be slipped through the top. Another snowflake and some ribbon and you have a great little personalized ornament for your tree. The ornaments fit perfectly inside the tin so that you can keep it safe all year round or give the entire package as a gift to someone special.

Tuesday, November 4, 2008

Dazzling Die Cuts!

Close To My Heart is having a dazzling promotion this month! I already showed you some Halloween cards I created using some of the die-cuts as well as the dimensional elements. They are very easy to use and come in an array of colors. I will be creating more projects with them and posting here soon. Here is a picture of the 6 available packages and what you get inside.


Please contact me for pricing and more information. In the meantime, I have some creating to do!

Saturday, November 1, 2008

Sticky Pretzels

As promised a fun treat to make for any occasion, but made especially fun on the holidays! I call them sticky pretzels, but they are also referred to as Turtle Pretzels. Here are pictures of me and my daughter making some before Halloween.


These are really simple to make. I found these bat and pumpkin pretzels at Walmart. I lined a cookie sheet with foil, coat with non-stick spray and arrange pretzels 1" apart. Top each pretzel with a caramel. Bake in 300` oven for 5-8 minutes, just until caramels begin to melt.


Remove cookie sheet from oven and spoon about 1 tsp. melted chocolate onto each caramel. Immediately press 1 pecan half onto each pretzel. Place cookie sheet in freezer until candy is set, about 10 minutes.


Ingredients:
24 small pretzels
24 unwrapped caramels
3/4 cup milk or semi-sweet chocolate chips, melted
24 pecan halves (you can toast them if you like)


Recipe modified from Foodgeeks.com

Friday, October 31, 2008

Tricks, Treats and Happy Halloween!

This week has been so busy. Not much time for scrapping or stamping. Here are some of the goodies I have been busy with this week.
You can't trick or treat with a plain bucket, let's decorate it!


My little baking girl all dressed up in a pumpkin apron and even a pumpkin spatula courtesy of her Grammy!


She always volunteers to lick the beaters!

The best philly cream cheese sugar cookies. YUM!

It's not Halloween without Jack Skeleton's head on a plate.
I also made some yummy sticky bat and pumpkin pretzels that I will share with you tomorrow! Not all of my "creations" involve paper, scissors and glue!

Monday, October 27, 2008

"Dazzling" Halloween cards

I had a few moments here and there last week to play with some new Die Cuts and finish the rest of my Halloween cards. I will tell you all about Close To My Hearts November promotion "Dazzling Die Cuts" next week. These were just some fun cards I put together using some of the frames, shapes and letters contained in these wonderful die cut packages.


The scary black cat card features B&T papers from Game On and the circle frame is from the Autumn die cut. The black cat is from the October Word Puzzle stamp set and I embossed the Green cs with distressed stripes (cuttle bug). Twill ribbon and black brads are CTMH.


Spooky Star card features the star die cuts along with star dimensional elements that also came in the package. They are self adhesive and so easy to use. {no cutting} I must point out that the background paper behind the stars in actually Hydrangea purple. For some reason my camera makes it appear more blue. Either way it represents the night sky, I sanded swirls intentionally to give it more appeal. The phrase "spooky" is from October Word Puzzle Stamp. Misc. ribbon and brads finish it off.


I really like how this card turned out. There's something about adding bling and liquid glass to projects. The "H" is the die cut and I used some older B&T paper. Stamps used are October Word Puzzle again and Hallow-scream. Misc. ribbon.


Finally, I pulled out some older stamp sets that are still on wooden blocks...Yikes!... I know, but just look at how cute these characters are! I colored them in with watercolor pencils and blended them. The sunflower yellow frame is the die cut and I mounted on black and placed over the purple cs. The orange cs was embossed with swiss dots (cuttle bug). The "Trick or Treat" phrase is from October Word Puzzle. Finally I finished with some bigger brads and misc. ribbon.

Friday, October 24, 2008

Spooky Delights!

I was able to snap a photo of the goodies I made for my Friday Night Club Members. It is October and Halloween is around the corner, so I wanted to create a spooky atmosphere for the gathering. I greeted everyone at the door in a black witch hat and some of the ladies dressed in spooky attire earning them free tax on their orders. I prepared some yummy skull cupcakes and decorated their water bottles with the Ahoy Matey stamp set and October Annotations stamp.


Thursday, October 23, 2008

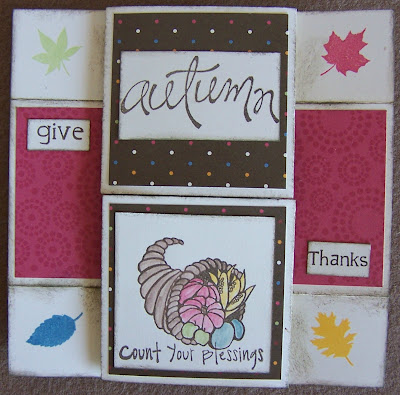
Thankful Flip Card

I have posted a couple of "flip" or "never-ending" cards now. This card will be the one that the ladies will learn how to make in November. I had a few request how to make the flip card and thought it would be fun to do a fall or thanksgiving theme. Some are still intimidated by this type of card, but I hope their fears will be eliminated once they see how simple the assembly is. I used the November Word Puzzle stamp and Thanksgiving Day (I believe is retired). The pattern paper I chose is Magic Moments. All product is CTMH.


Tuesday, October 21, 2008

Spooky Outdoor Decor!

I finally got around to taking some pics of my spooky outdoor decor. My daughter even got in on the fun. We have noticed cars slowing down or coming by for a second look.


In the daylight:


At night:

November Scramp Club Project

Every month I hold a Scramp Club. I try to give the ladies a variety of projects, but every once in awhile I will make just page layouts. This month I wanted to show them how to add additional protected photo's or journaling. This is a great technique for adding to your pages without having to remove the entire page from the sheet protector. Perfect for those of us with little kids that adore flipping through the pages of our scrapbooks.
In this photo you will see that I have also used a random stamp resist technique. Using the Nature's Vein MyAcrylix I stamp randomly in clear ink then heat emboss with a clear embossing powder. I continue stamping leaves now in fall ink colors. Final step would be to sponge a brown ink all over the base page. This technique makes a soft, warm textured background paper that is easy and fun.

I stamped the base and vein of the leaf on solid cardstock, cut them out, then lightly crumpled them to create a real looking leaf. I embellished them all together with some clear buttons that have solid cardstock liquid glassed behind them and thread with floss.

November Word Puzzle

Here is the entire photo of the November Word Puzzle pages I posted earlier this month. The ladies that attend this workshop are very excited to make these pages. They were somewhat surprised by the color choice for fall pages. At first it was hard to adjust to the Perfect Day Papers but the cocoa cardstock really grounds them and makes it really work well! Other than the November Word Puzzle stamp set I am having them trace and cut out some Dimensional Element letters to create the "Fall" title. It's super cute and super simple!