I have combined some Buzz and Bumble papers with the new Sarita papers for the sketch this week on Freshly Made Sketches. I have also been patiently waiting to play with the new irresistibles hexagons chipboard. These are so cool and easy to add to just about any project!
Showing posts with label honeycombs. Show all posts
Thursday, September 19, 2013
Tuesday, August 6, 2013
Bearizona
My favorite experience so far this summer was going to a place called Bearizona. Have you ever been there? It's just outside Williams, Arizona. It's a fairly new attraction to the area and well worth the visit.
You drive through the first section of the park in your own vehicle where you can view various animals in an open environment. My kids related it to Jurrasic Park! We saw big horn sheep, American buffalo, burro, white bison, arctic fox, and my favorite black bears! After the driving portion you can walk around the enclosed park to view some smaller animals like porcupine, beavers, badgers, red fox, lynx, and the baby and teenage bears. There was a petting zoo area with your farm animals and we saw a few birds of prey.
I wanted to focus my scrapbook page on just the bears though and I knew the Artbooking cartridge would provide the perfect background papers. Wood grain, so cool! The Make if from Your Heart Volume 2 book provided me inspiration for the sketch.
The sketch in the how-to book just had papers in various sizes layered behind the photo, but I decided to create a pocket behind the photo for tucking in the brochure with the map. It will be a great memorabilia to keep, plus my son loves looking at maps!
I saved the negative cardstock from the "adventure" word I used on another project. I just backed it with some cocoa paper to make the word pop!
You drive through the first section of the park in your own vehicle where you can view various animals in an open environment. My kids related it to Jurrasic Park! We saw big horn sheep, American buffalo, burro, white bison, arctic fox, and my favorite black bears! After the driving portion you can walk around the enclosed park to view some smaller animals like porcupine, beavers, badgers, red fox, lynx, and the baby and teenage bears. There was a petting zoo area with your farm animals and we saw a few birds of prey.
I wanted to focus my scrapbook page on just the bears though and I knew the Artbooking cartridge would provide the perfect background papers. Wood grain, so cool! The Make if from Your Heart Volume 2 book provided me inspiration for the sketch.
The sketch in the how-to book just had papers in various sizes layered behind the photo, but I decided to create a pocket behind the photo for tucking in the brochure with the map. It will be a great memorabilia to keep, plus my son loves looking at maps!
I saved the negative cardstock from the "adventure" word I used on another project. I just backed it with some cocoa paper to make the word pop!
Wednesday, July 3, 2013
Sweet Bee Birthday
My card today features a sweet bumble bee buzzing by with a Birthday wish! This card was also created for three different challenges this week~
1. Mojo Monday sketch...can you believe their celebrating 300 challenges!!
2. The Paper Players Tic-Tac-Toe challenge.
3. Dynamic Duos color challenge...gray & ???
1. Mojo Monday sketch...can you believe their celebrating 300 challenges!!
2. The Paper Players Tic-Tac-Toe challenge.
3. Dynamic Duos color challenge...gray & ???
A closer look at the bumble bee's glittery wings!
The sketch~
For the circle element in the sketch, I formed some mini honeycombs in a circular pattern!
For my Tic Tac Toe I chose the right column; Birthday, Yellow & Ribbon
Finally, My Close To My Heart color choices were Slate Gray and Crème Brulee, lovely & sweet!
Be sure to check out each of these challenge blogs for inspiration and to play along!
Wednesday, March 27, 2013
Buzz and Bumble Birthday Gift
What's a card exchange without a project to go along with it? Keeping with the Birthday theme of my card exchange I decided to create this Kraft container using the Buzz and Bumble papers. I also used the fun Honeycombs stamp set and sentiment on a label cut out from the Art Philosophy cartridge. The little Burt's Bees goodies inside match perfectly with the theme decorating the container! What a great gift this would be for a special loved one!
The gorgeous flower on the top of the container was 100% inspired by the talented Lisa Stenz! Her idea for creating and assembling the flower was simple, yet made such an impact on the finished result. See her directions here.
Monday, March 25, 2013
Birthday Themed Card Exchange
What a busy month this has been! Earlier this month I posted about my upcoming card exchange with a Birthday theme seeing how my family has celebrated many Birthday's this March! Participants could create anything with a Birthday theme...young or old, feminine or masculine, serious or hilarious! There was a wide variety as usual, but all done beautifully with the help of gorgeous Close To My Heart products!
First off is my card. I think it turned it out to be one of my favorites in a long while.
One of the girls remarked that the black tulle was her favorite part of the whole card!
Next is Barbie~ She is new to our exchange and would you believe new to paper crafting?!! What a gorgeous card and that butterfly is amazing!
Janet's card is full of amazing cut outs from the Cricut cartridges. Her card could be used for both feminine or masculine I think!
Tommie shows off her dry embossing skills and great distressing techniques.
I love the black and yellow color theme that Pat chose for her card. She surprised us with an unexpected Cricut shape for the flower vase! Can you guess what it is?
Julie's cards travel many miles to reach me every year. How fitting that her vellum envelopes should be post marked with a Birthday sentiment!
Her card also featured a fun split opening behind the cute party hat!
Nanette's card is simply sweet with just a bit of pearls and lace to give it a soft, vintage feel!
and finally... A bright and fun card from Stacie. The pops of color and dry embossing really make you want to celebrate!
A big thank you to all the ladies that participated in the exchange. I truly enjoy sharing all of your creations and seeing the wonderful artwork you design.
First off is my card. I think it turned it out to be one of my favorites in a long while.
One of the girls remarked that the black tulle was her favorite part of the whole card!
Next is Barbie~ She is new to our exchange and would you believe new to paper crafting?!! What a gorgeous card and that butterfly is amazing!
Janet's card is full of amazing cut outs from the Cricut cartridges. Her card could be used for both feminine or masculine I think!
Tommie shows off her dry embossing skills and great distressing techniques.
I love the black and yellow color theme that Pat chose for her card. She surprised us with an unexpected Cricut shape for the flower vase! Can you guess what it is?
Julie's cards travel many miles to reach me every year. How fitting that her vellum envelopes should be post marked with a Birthday sentiment!
Her card also featured a fun split opening behind the cute party hat!
Nanette's card is simply sweet with just a bit of pearls and lace to give it a soft, vintage feel!
A big thank you to all the ladies that participated in the exchange. I truly enjoy sharing all of your creations and seeing the wonderful artwork you design.
Labels:
birthday cards,
card exchange,
happy birthday,
honeycombs
Monday, March 18, 2013
Sweet Honey Challenge
My card today features the new Honeycomb stamp set and the fabulous For Always fabric! It uses the color challenge at Dynamic Duos and the sketch challenge on The Paper Players. I kept it very clean and simple and the colors are very bold, but so lovely! The "dessert" option on Dynamic Duos was to use ribbon. I did not really choose a ribbon, instead I pulled in the black script fabric and tied it all together with some Crème Brulee twine!
I think it turned out pretty "sweet"!
{My yellow color of choice was Close To My Heart Crème Brulee.}
Thursday, January 31, 2013
The Lovely Chantilly {Spring Open House}
I have some more artwork for you today from my Spring Open House. One of the prettiest papers in the new book is the lovely Chantilly. I was able to create a couple of layouts showing the papers versatility. It has lots of pinks and reds in it, but is not necessarily a girly paper!
Before I show you the pages, I want to share a card I made for the Paper Players challenge. This card definitely shows off the pretty, feminine side of Chantilly!
This first layout shows the "girly" side of Chantilly. It has pinks, reds, yellows and floral patterns. I created this one for my teen daughter that enjoys fashion.
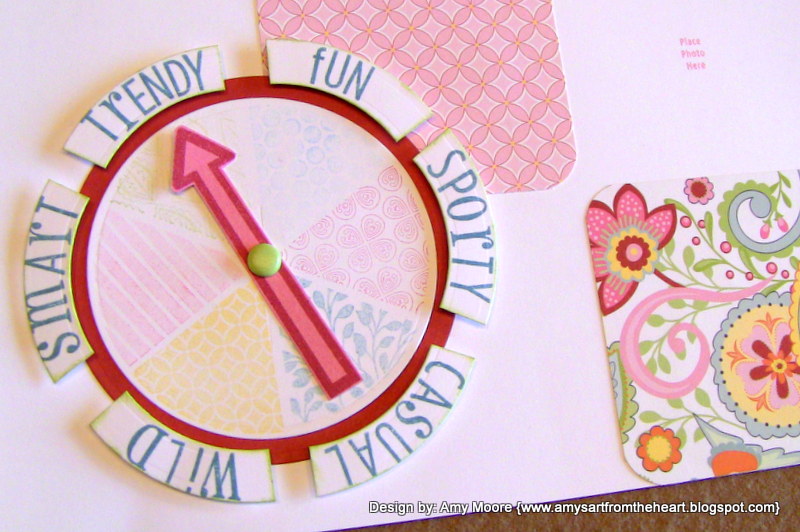
Check out this fun embellishment created with the stamp included in the Workshop on the Go kit! The arrow can spin to indicate my daughter's fashion choice!
The little dress was cut on the Cricut Artiste cartridge then paper pieced!
Flip to the other side of the double sided paper and you get a whole new look of Chantilly! How adorable would this page be for a little boy or even your Easter celebration!
The recent trend of honeycombs is so graphic and fun! The little sentiment included on the stamp in the kit is just perfect for the shapes!
The fabric buttons are a quick embellishment anywhere on your project.
There you have it! The lovely Chantilly paper is pretty and oh so versatile! I would also recommend the Workshop on the Go kit so that you can play with not only the gorgeous papers, but the stamp, fabric buttons, glitter gems and instructional brochure. {G1053 $29.95}
Before I show you the pages, I want to share a card I made for the Paper Players challenge. This card definitely shows off the pretty, feminine side of Chantilly!
This first layout shows the "girly" side of Chantilly. It has pinks, reds, yellows and floral patterns. I created this one for my teen daughter that enjoys fashion.
Check out this fun embellishment created with the stamp included in the Workshop on the Go kit! The arrow can spin to indicate my daughter's fashion choice!
The little dress was cut on the Cricut Artiste cartridge then paper pieced!
Flip to the other side of the double sided paper and you get a whole new look of Chantilly! How adorable would this page be for a little boy or even your Easter celebration!
The recent trend of honeycombs is so graphic and fun! The little sentiment included on the stamp in the kit is just perfect for the shapes!
The fabric buttons are a quick embellishment anywhere on your project.
There you have it! The lovely Chantilly paper is pretty and oh so versatile! I would also recommend the Workshop on the Go kit so that you can play with not only the gorgeous papers, but the stamp, fabric buttons, glitter gems and instructional brochure. {G1053 $29.95}
Subscribe to:
Posts (Atom)