Showing posts with label paper flowers. Show all posts

Sunday, January 1, 2017

Celebrate January 2017!

With a new year there is always new possibility and of course there is a new Seasonal Expressions Idea Book! January is National Papercrafting Month and Close To My Heart has a beautiful project to ignite your creativity. Let's take a look at a few of the new offerings.


 Flower wreaths are very much in trend this season and this kit has everything you need to create a beautiful home decor item. Even better....you can get it for FREE this month! Click on the Current Specials tab at the top for more details.

Here is a look at the wreath I made following the instructions included. The only things I added were the gold gems and some gold shimmer from the new shimmer brush in the SE 2017 Idea Book.


CTMH has brand new spring idea books in white, sea glass and pink. They come in D-ring or Post-bound.


January stamp of the month, Adore You, has images and sentiments certain to express your love this season. See more details on the Current Specials tab at the top.


Meet the new paper collections~

Dreamin' Big


 Hello Lovely

 Some Kinda Wonderful

 Sugar Rush

You can always click on the Idea Book image on the right side column to view the entire new book. Be sure to also check out the new products online, there you will see additional workshop and project ideas.

Tuesday, January 19, 2016

Spring Wreath

Inspired by the wreath on the Annual Inspirations Idea Book I created a Spring version. My customers really liked the red and white version and wanted a class. I will be teaching them how to make this wreath on Saturday from cutting all the pieces on their Cricuts to lots of hot glue assembly!


I chose some pretty colors for my flowers of pinks and yellow. The ladies will get to choose whatever colors they wish. I could see this wreath in red, white and blue perfect for the Fourth of July!

Hopefully, I will remember to take pictures of all the completed wreaths to show you the variations! Have a great week!

Thursday, February 3, 2011

Crazy Cool Flowers

Leopard print (kind of) and cotton candy pink just scream wild and fun. I love these flowers too! This flower technique was shared in a past Idea Book, but I never thought to alternate the prints. How cool are they?


Thursday, July 29, 2010

H2H Color Challenge

It's a color challenge on Heart 2 Heart Challenges Blog this week. It is an unusual mix of colors so it had me intrigued right away. Here is what I came up with. Be sure to check out what the fabulous design team created too.


I was also excited to try the color combo on CTMH founder Jeanette Lynton's blog. I will post my creation soon, so come on back!

Wednesday, July 7, 2010

Veranda Beauty

I still think the Veranda papers are just so pretty. On this card I stamped circles from the Hit the Spot stamp set then punched them out. Underneath I layered coordinating papers. I scallop punched the striped b&t paper then finished off the card with a collage of goodies. Hope you like!


Wednesday, May 19, 2010

Clearly Fabulous

Close To My Heart's new Clear Cards are fabulous, fun and quite addicting. They are super easy to use and so cool to experiment with. Here are just a few I've done since receiving my order. The first one was taken mostly from the Summer Idea Book. It uses Splendor papers and chipboard Pizzaz Irresistibles.


You can find clever ways to hide your message inside. This one also features a paper flower using Veranda papers.


Monday, May 10, 2010

Pockets full of Thanks

This is my project for this Friday. My club ladies will be making these thank you cards and pocket book to hold them. I also use a fun technique, which is the challenge this week on H2H Challenges. {stop by the H2H blog to see more techniques and amazing artwork} Dying paper flowers with re-inkers is so simple. I also stamped directly on the cover flower with a background and texture stamp. I used re-inkers in the following colors: crystal blue, creme brulee, sweet leaf and holly hock. Just a few drops in a tablespoon of water is all you need. I also got to use some sassy strands that I've had stashed for awhile. The scalloped square was made from a spellbinders die and then I punched a small hole in each scallop. The "book" holds four cards & envelopes that measure 4x4 inches. This would be great to have for yourself or to give as a gift.


Sunday, April 18, 2010

Back to Basics with Paper Flowers


Back to Basics Club in April couldn't be easier! The pages are simple and clean. They require minimal cardstock and papers. The only stamping required is the month title and a simple sentiment from the Month of June stamp. Embellishments are 1/2 purchased and 1/2 handmade. Chocolate ribbon and Colonial White Brads are your purchased embellishes and the flower is totally handmade and really easy.
Here are the pages side by side ~ {the sentiment on the bottom of the right page says: Not a Care in the World}

To make the flower you only need to cut 4 circles of varied sizes and then trim with scallop scissors. You will then fold them in half and then in quarters. Now open them again, pinch in the middle and scrunch them up a bit. Layer them on top of one another and secure with a brad.
Here are some other ways to create paper flowers. The directions for this technique are illustrated in the new Summer Idea Book. Just like the other paper flower they are simple and quick to make. Scroll down for more info.
How to make circle punched paper flowers:
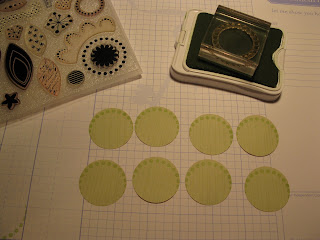
1. Punch 9 circles of the same size, you can use any size punch, I believe mine is 1 1/4". I then stamped a border image on 8 of the circles (you will use the 9th circle as the base of the flower).
2. Then fold in two of the sides towards the center, overlapping the edges.
3. Adhere the points of the folded circles onto the 9th remaining circle.

4. Finish the center of the flower with a button or brad and attach to your project.


I hope you'll try some of these flower techniques. They are super simple and really add that WOW to your project!!