Monday, September 29, 2008

Sneak peek at November Word Puzzle


Here is a sneak peek at the November Word Puzzle pages. I will post the entire pages later. As you can see the colors are unexpected for "fall", but still work really well.

Sunday, September 28, 2008

October Word Puzzle Pages

Here are the pages that the Word Puzzle Club ladies will be completing for the month of October. Every month Club members get to complete 2 page layouts featuring the Word Puzzle MyAcrylix Stamp sets. I focused on the stamps that featured those creepy creatures that fly on Halloween night. You can search through this Blog for the pages we did in September and I'll be showing a sneak peek of the November pages!


I popped the October title as well as one of the centered photo mounts.


Friday, September 26, 2008

Cougar Notebook


Decorating composition notebooks is certainly not a new idea. I was taught how to do this years ago and continue to make them for various reasons. This one was made for my daughter in just one evening. She was selected to be a member of a leadership group at her school called the Cougar Cub Club. She informed me that she needed a notebook for her group and a pen. Well....I couldn't just hand her a spiral bound book from mead or 5 star. Why not create something uniquely for her and you can't pass up a .50 cent comp book. It's difficult to see in the pic, but the pen has her name stamped on the inside. Super easy and super cute.

All CTMH product except the green and yellow ribbon.

Thursday, September 25, 2008

Another Box Bag with instructions

Here are instructions for making the box bag:


You will need to start with a piece of cardstock that measures 4 1/2 x 4 1/2 inches. This piece is only visible from the inside when all complete so it does not matter what color it is.


Then score that piece 1" around all edges.
And score on a diaganol in each square like this:


Fold up all sides and adhere the corners on the inside of the box:


Next you will cut a piece of B&T to measure 5 1/2 x 11. This will cover the outside of your box. Apply adhesive along the bottom inside of your B&T and up the side of the finishing edge. Start wrapping it along the outside of the box. It is best to start in the middle of one side so that your seam will be in the center of the back:


Next cut a piece of cardstock to measure 2 x 11. Scallop the top edge of this piece and trim the bottom so that your final measurement is 1 1/2 x 11. You may choose not to scallop and instead use ribbon or ricrac to finish the edge. Attach this piece around the bottom base of the box like you did the B&T paper.


Finally cut or punch tabs for the top of the box and punch holes in them to string your ribbon through. On this bag I used 2 holes, but on the Holiday bags I used a single hole.


All that's left to do is decorate and embellish your bag however you like. Fill with goodies and tie it all together with ribbon.


Tuesday, September 23, 2008

Halloween Flip Card

Yes, another flip card. They are so much fun to make and the kids continue to be fascinated with them. Really, truly they are not difficult to make, just takes time to decorate and embellish them.


In this picture you can see my son holding the card demonstrating how it flips endlessly.


Box Bags

While searching the blogsites of other creative crafters I stumbled upon these little boxes in a bag. What a great way to craft your paper so that you can give special gifts in a neat little package. Plus, they are super easy to make and do not require a bunch of paper. You can find instructions here.

Here are a few I made for the Holidays.


Here is a side view of the bag. The base of the bag ends up measuring 2 1/2 x 2 1/2 inches and is roughly 5 1/2 inches tall. You can place small items inside such as candy, toys, scrapbooking embellishments, votive or tealight candles and travel size bath & body products.


Saturday, September 20, 2008

Accidental Creation


While I was making my flip card I originally stamped this flower in clear ink and embossed it. I then proceeded to sponge ink around the embossed image and decided I did not care for it and set it aside on my desk. I came back to it a few days later and decided to try and salvage it. I started by brushing on some liquid glass, sprinkling clear embossing powder over it and a touch of glitter then heating it. I realized that the liquid glass could be a little bit thicker so I repeated the whole process over again. This time while heating, it began to bubble. "Oh, my" I thought, "hope this thing doesn't catch fire!" I watched as it slowly transformed and began bursting the bubbles with the pointed end of my paint brush. It just sort-a crinkled and crackled a bit and I decided NOW I like it and would attach it to a project. I came up with this simple card, did a scallop edge, added the sentiment, brads and ribbon. Voila, a beautiful card.... or an accidental creation?

Spooky Halloween Project

Here are the full photos of the project I gave you a sneak peek to last Friday. It is the project that my Friday Night Scramp Club members will be making in October. While I was doing my back to school shopping in August I came across these pencil boxes for only .50 cents each. I grabbed a few of them with the intention to do something with them, how could I pass up a bargain like that. This is what I came up with. Something fun to decorate your table, countertop or niches for Halloween. When the holiday is over you have a cute but practical way to store it. I used the star patterned paper from the Game On papers and other cardstock from Close To My Heart. I really liked playing with the Spooky Night stamp set. You can color in the images with colored pencils, chalk, or I used my waterbrush pen and ink. I also used the Building Block Alphabet for the word Halloween and "happy" is from the Hallow-Scream stamp. Colors are black, grey wool, goldrush, pansy purple, olive and sunflower.


Thursday, September 18, 2008

Skeleton Scroll

So I had to play with my new Cuttlebug skeleton embossing folder. I also used the Lasting Impressions skeleton embossing template layered on black cardstock and placed on the olive scroll embossed cardstock. I had to do some paper piecing and sanding to get the skull to turn out just right. Finally I finished the edge with "Happy Halloween" embossed in white powder and a piece of black stitched ribbon.
I'm looking forward to creating more spooky cards.

I'm flipping for this card!!


I originally saw this idea in my kids lunchables, (Star Wars themed flip card) and looked at it several times curious of how to re-create it in a larger version. Then I saw another consultants version of it and she had instructions to share...Thanks Lisa! At first I thought it would be very tricky and somewhat complicated, but in reality it is a very simple assembly. The majority of the time is spent on decorating each page. What a cool idea, I might just make some more for the Holidays!!
Most products are Close To My Heart: Perfect Day Papers; Colonial White CS; Juniper, Sorbet, Tulip, Creme Brulee, Cocoa inks; Sparkles; Clear Buttons; Life's Creations & Treasure Life (Sept. SOTM) Stamp sets; spring brads; misc. ribbon and thread; Cuttlebug Swissdots embossing template.


Piggy Cakes!

This sweet little card was inspired by the new Originals book. I love making the pigs dimensional by pop dotting their little faces. I used all Close To My Heart products: Vineyard Berry, Colonial and Blush cardstock & ink, Nursery Bash & Simple Stitches stamps, chalk and glitter.

Friday, September 12, 2008

Spooky Sneak Peek!


How about a little sneak peek at my Scramp Clubs October project. It's just a little bit spooky, but so much fun! I will be revealing the entire project to my Club members next Friday, and will post it here shortly after. I am hoping to begin my Halloween cards and projects very soon. My kids and I love Halloween, so keep checking back for more goodies!

Tuesday, September 9, 2008

Life's Creations Birthday


Look at this sweet little card I made for my Mother in law's Birthday coming up later this month. I really like the flower in the Life's Creation stamp set as well as the color combo I came up with. I used the new Sorbet and Tulip colors with Chocolate and White Daisy. I dry embossed the sorbet cardstock in vertical stripes then lightly sanded it. I also got to use my new fiskars scallop punch, what a time saver that gadget is! The Chocolate card stock comes textured already so all I did is lightly sand it and adhere it to my card base. The Birthday sentiment is from Say it in style. Finally, I used the regular sized antique copper brads as well as the bitty sized. Hope she likes it.


Back 2 School Bake Sale


S'mores anyone? Kids are back to school and that means volunteering, bake sales and Open Houses. I wanted to make my contribution to the bake sale, but wanted something clever and different. This is what I came up with.


I made these little "S'mores To Go" packages. Inside each package is a Hershey chocolate bar, mini marshmallows and graham crackers. I also included a recipe for No Fire S'mores, thanks to Paula Dean and Food Network. com! All items are individually wrapped and swaddled in polka dot cellophane. Finally I tied it all together with some chocolate organdy ribbon and these darling tags I made using Lasting Impressions embossing templates and paper from Close To My Heart.

Here is the recipe to make the No Fire S'mores. It's very simple and would be such a nice treat for families to share together.


But, that's not all! I also made a dozen goodie bags filled with Classic Chocolate Chip Cookies. These were made with a 5x12 sheet of card stock with a hole cut out of the center front to showcase the yummy cookies inside. I stamped the apple and sentiment from the September Word Puzzle stamp and finished it with some twine. The school asked to have all baked goods packaged individually, so I think these qualify!

Monday, September 8, 2008

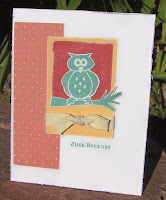
Look Whooos back!


I told you I'd be back with more from the "Whooo loves you" stamp set. I had fun playing with the owl and the variety of mushrooms offered in this set. The cards also feature the new colors in the Close To My Heart Idea Book. I kept them very simple though, not a whole lot of fuss or embellishment. Also, all of the designs came from the new Originals Card Program, with very little changes to the original layout. So many possibilities...whooo knew!


Thursday, September 4, 2008

Friends

These are the pages that my Word Puzzle Club members will be making this month. I did not use many of the stamps provided in the September Word Puzzle set, but managed to incorporate some other cool elements. The title "friends" is created from the dimensional elements monograms, but we are cheating and tracing them, cutting them out and popping them off the page. I also used a couple of the new colors, Creme Brulee and Tulip. Not only are these colors found in the cardstock, but in the embellishments as well. The small dot pattern on the Heavenly Blue cardstock is from the Argyle Backgrounds stamp set and the Creme Brulee was dry embossed in a vertical stripe. Finally, I added a chipboard ribbon slide with twill ribbon and some white daisy flowers.

Tuesday, September 2, 2008

Whooo Loves You!

I was very happy to see a new stamp set featuring owls in the new Close To My Heart Idea Book. They seem to be such a big trend right now and they are so cute. I also used one of my new Cuttlebug embossing folders called swiss dots. I can't wait to play some more with this stamp set, so hopefully "owl" be posting more artwork soon!
I popped the image of the owl.