Showing posts with label projects. Show all posts

Thursday, October 29, 2015

Halloween Past

Looking through my Blog I have found all sorts of projects that I designed specifically for Halloween. Most of these items still decorate my house today! I invite you to take a look back at some of my posts for inspiration. Have a fun...not so spooky...

Happy Halloween


Thursday, January 1, 2009

Valentine Club Project

Here is my January Scramp Club project. Ladies will learn to use Close To My Heart's 9x9 journaling pages to create cards. It's a great way to make the most of your papers and to think outside of the box. I chose the Amore' papers and the gals will get their choice of darker cards (tulip colors) or lighter cards (blush colors). The best part of the new journaling pages is that there are more choices of patterns. All of the card ideas are from the Originals book.

Tuesday, December 30, 2008

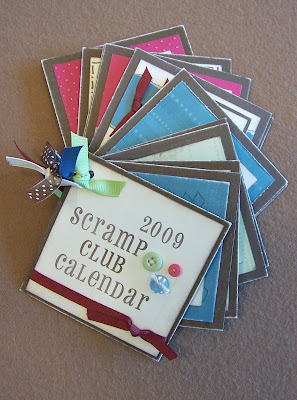
Scramp Club Calendar


Here is a fun calendar I created to keep track of upcoming club dates. I used January's Stamp of the Month called Moments in Time. Each page measures 4x4 and is kept together on a jump ring. The Moments in Time stamp set comes with all the mini calendars, frames, months and dates. It also contains little shapes like stars and circles perfect for indicating the date of my class or workshop. I focused on a few pages from the calendar to show the newest Connection Club Reward; Clear Shapes. These were super easy to work with. You can punch holes in them to secure it with a brad or mount on cardstock with liquid glass. What a great little project, I already have more ideas bubbling in my head.


Sunday, November 23, 2008

This one takes the cake!

What a fun way to give an ordinary gift card! The base of the "cake" is a pre-made box purchased in the craft store. They come in all sorts of shapes and sizes. I covered it with paper, ribbons and buttons. On the lid I added lots of glitter and the flower shapes are from those "Dazzling Die Cuts". The cake stand was assembed from pieces of cardboard and styrofoam also covered in paper, cardstock and ribbons. The large pink scallops were punched out from one of the dazzling die cut sheets, and glued on. How easy is that! Once everything was decorated I attached it all together with a hot glue gun. The birthday girl simply lifted the lid of the "cake" to reveal a gift card and yummy chocolates.


Here's the birthday girl with my daughter after receiving her cake!


Tuesday, October 14, 2008

Hallway Halloween Decor

This friday I will be holding my monthly workshop where the ladies will be making the "Happy Halloween" table decor that I posted previously. I wanted to decorate a hallway shelf with the same project, but further embellished it. Here is how it turned out.


Monday, October 6, 2008

Holiday Workshop

This year's Holiday Workshop is Merry & Bright! Attendees will be making this darling mini-accordian album using a portion of the Merry and Bright card kit. By adding some cardstock and a few embellishments they will complete an entire mini album along with a box to store it all in. Perfect to keep your own Holiday memories in or great to give as a gift to someone this season. Workshop guests will be amazed at how fast, simple and easy it is to create this lovely little album.


Friday, September 26, 2008

Cougar Notebook


Decorating composition notebooks is certainly not a new idea. I was taught how to do this years ago and continue to make them for various reasons. This one was made for my daughter in just one evening. She was selected to be a member of a leadership group at her school called the Cougar Cub Club. She informed me that she needed a notebook for her group and a pen. Well....I couldn't just hand her a spiral bound book from mead or 5 star. Why not create something uniquely for her and you can't pass up a .50 cent comp book. It's difficult to see in the pic, but the pen has her name stamped on the inside. Super easy and super cute.

All CTMH product except the green and yellow ribbon.

Thursday, September 25, 2008

Another Box Bag with instructions

Here are instructions for making the box bag:


You will need to start with a piece of cardstock that measures 4 1/2 x 4 1/2 inches. This piece is only visible from the inside when all complete so it does not matter what color it is.


Then score that piece 1" around all edges.
And score on a diaganol in each square like this:


Fold up all sides and adhere the corners on the inside of the box:


Next you will cut a piece of B&T to measure 5 1/2 x 11. This will cover the outside of your box. Apply adhesive along the bottom inside of your B&T and up the side of the finishing edge. Start wrapping it along the outside of the box. It is best to start in the middle of one side so that your seam will be in the center of the back:


Next cut a piece of cardstock to measure 2 x 11. Scallop the top edge of this piece and trim the bottom so that your final measurement is 1 1/2 x 11. You may choose not to scallop and instead use ribbon or ricrac to finish the edge. Attach this piece around the bottom base of the box like you did the B&T paper.


Finally cut or punch tabs for the top of the box and punch holes in them to string your ribbon through. On this bag I used 2 holes, but on the Holiday bags I used a single hole.


All that's left to do is decorate and embellish your bag however you like. Fill with goodies and tie it all together with ribbon.


Tuesday, September 23, 2008

Box Bags

While searching the blogsites of other creative crafters I stumbled upon these little boxes in a bag. What a great way to craft your paper so that you can give special gifts in a neat little package. Plus, they are super easy to make and do not require a bunch of paper. You can find instructions here.

Here are a few I made for the Holidays.


Here is a side view of the bag. The base of the bag ends up measuring 2 1/2 x 2 1/2 inches and is roughly 5 1/2 inches tall. You can place small items inside such as candy, toys, scrapbooking embellishments, votive or tealight candles and travel size bath & body products.


Saturday, September 20, 2008

Spooky Halloween Project

Here are the full photos of the project I gave you a sneak peek to last Friday. It is the project that my Friday Night Scramp Club members will be making in October. While I was doing my back to school shopping in August I came across these pencil boxes for only .50 cents each. I grabbed a few of them with the intention to do something with them, how could I pass up a bargain like that. This is what I came up with. Something fun to decorate your table, countertop or niches for Halloween. When the holiday is over you have a cute but practical way to store it. I used the star patterned paper from the Game On papers and other cardstock from Close To My Heart. I really liked playing with the Spooky Night stamp set. You can color in the images with colored pencils, chalk, or I used my waterbrush pen and ink. I also used the Building Block Alphabet for the word Halloween and "happy" is from the Hallow-Scream stamp. Colors are black, grey wool, goldrush, pansy purple, olive and sunflower.


Friday, September 12, 2008

Spooky Sneak Peek!


How about a little sneak peek at my Scramp Clubs October project. It's just a little bit spooky, but so much fun! I will be revealing the entire project to my Club members next Friday, and will post it here shortly after. I am hoping to begin my Halloween cards and projects very soon. My kids and I love Halloween, so keep checking back for more goodies!