This past weekend I held my annual Christmas card exchange. The ladies made some beautiful cards and I even added in a special project for them! These gals always inspire me, I hope you are inspired as well!
First up is the card and stamped bag I created using the White Pines paper, WOTG stamp set and Fern Twine and gold glitter paper.
The little bag holds a couple of tea bags perfectly. This would be a great gift attached to a tea cup or mug.
This card uses some older papers in a design that reminds me of a quilt or stained glass window, so elegant!
This card uses the adorable Christmas tree print White Pines paper and some glittery & gold snowflakes!
What I love about this card is that the holly on the ornament was cleverly cut out from some older papers. Plus, there is just enough bling and sparkle making this a pretty, festive card!
After creating all the cards I surprised the ladies with a special Christmas project. 'Tis the season for hot cocoa and giving unique handmade gifts! I used some older plastic treat tubes and filled them with cocoa mix and chocolate dipped candy canes. I then created and decorated a little box to contain them. I dressed up the box with a Cricut cut Hot Cocoa Cup {purchased from Miss Kate Cuttables} and a sentiment I downloaded online and printed.
I'm so grateful for my customers! Hanging out with them on the weekend, creating projects and laughing is always the best therapy!
Showing posts with label mistletoe. Show all posts
Monday, November 16, 2015
Sunday, July 8, 2012
Parade of Pages {Christmas in July}
It's never too early to start preparing for the Holidays. I know some crafters that begin all their Christmas cards now. So why not have some Christmas pages ready for all those pictures I always take!
I used some older Mistletoe papers that I'm certain will be a perfect fit for any photo's I might take as the colors match my home Holiday decor. I am so in love with how my little banner turned out. It was created with the Milepost Corrugated Shapes, scallop punch and the Typewriter Keys alpha stamp.
Friday, December 2, 2011
Greetings 4 You
My next set of Christmas cards uses the Heart 2 Heart sketch challenge this week. I used some Mistletoe papers in olive green with Cocoa and Cranberry cardstock. My wreath has been adorned with some red glitter gel to give this very classic looking card a bit of bling.

Here is the sketch~

Here is the sketch~

Labels:
christmas cards,
h2h challenge,
mistletoe,
sketch challenge
Thursday, November 10, 2011
Metal Mania Sketch with St. Nick
I am completing two challenges today with one card. Heart 2 Heart blog is challenging us to use metal on our creations this week. I've chosen to use a metal frame, new england ivy metal tab and some metal brads to attach them both to the card base.


This card is also for the sketch on Mojo Monday this week.

I also wanted to share my inspiration for this card. While my mom is visiting this month we will create her Christmas cards together. I like to give her a Close To My Heart Idea Book for ideas. This was one of the cards she liked, so I gave it a try with the two challenges this week. You will have to stay tuned to see what her final card selection will be!
This card is also for the sketch on Mojo Monday this week.

I also wanted to share my inspiration for this card. While my mom is visiting this month we will create her Christmas cards together. I like to give her a Close To My Heart Idea Book for ideas. This was one of the cards she liked, so I gave it a try with the two challenges this week. You will have to stay tuned to see what her final card selection will be!
Thursday, October 6, 2011
Christmas Begins at Home
It's a sketch challenge on Heart 2 Heart this week. I had this idea for a Christmas card and the sketch worked beautifully for it. Here is the sketch.

Here is my card~
Sunday, February 27, 2011
A "Cool" New Product + {H2H Challenge}
I've been experimenting this weekend with a fun new product in the Spring Idea Book. The Color Ready Kraft Borders are wonderful. Some great features of this product are that the cutting is done for you already as is the adhesive as you simply peel and stick. Love that! They come in a 12" length so they are perfect for scrapbook pages or you can simply cut them down to fit any project you are working on. They are extremely versatile in the ways you can add color also. Here are a few samples I've discovered so far.

This first card was done for the H2H challenge this week. Create something that reminds you of the word "cold". Brrrr! The surrounding mountains look beautiful with a dusting of snow, but quite frankly I'm looking forward to spring and summer. I took inspiration from H2H designer Lisa Stenz this week and opted for a chilly ice cream treat. That's deliciously cold!
For the color ready border on this card I used white acrylic paint mixed with 4-5 drops of Crystal Blue re-inker. I cut the border to the length I needed then painted it and allowed it to dry.
On this next project I directly inked the border on a Cranberry ink pad. I also left it at the 12" length to fit my scrapbook page. This is my end of year pocket page that I have been completing my albums with for a couple years now. I love filling the pocket with special homemade cards and photo's that friends and family have sent for the Holidays.


How cute is this cup cake card? The image is from the same stamp I used on the ice cream cone card. My daughter loved this card when I completed it. My guess is that the border is her favorite color, bright green! Any guesses on how I colored them green? Can you find the other border piece I used?

Here is the other border piece! It's perfect as a little Birthday candle. I left it plain with no added color.
The green border piece was colored with....did you guess it.....CHALK!
Because of the texture of the border, after applying the chalk, the finished piece looks a bit like felt. I experimented with a few chalk colors and really liked the result of the brighter colors. The hot pink really popped, the blue was calming and it even took on a subtle change of color with a really bright yellow. My favorite was the bright green though and I knew my daughter would approve!
This first card was done for the H2H challenge this week. Create something that reminds you of the word "cold". Brrrr! The surrounding mountains look beautiful with a dusting of snow, but quite frankly I'm looking forward to spring and summer. I took inspiration from H2H designer Lisa Stenz this week and opted for a chilly ice cream treat. That's deliciously cold!
How cute is this cup cake card? The image is from the same stamp I used on the ice cream cone card. My daughter loved this card when I completed it. My guess is that the border is her favorite color, bright green! Any guesses on how I colored them green? Can you find the other border piece I used?
Here is the other border piece! It's perfect as a little Birthday candle. I left it plain with no added color.
Saturday, December 18, 2010
More Felt Christmas Cards
Here are a few more Christmas cards I have created using the heartfelt die-cuts. Again I chose the Mistletoe papers with colonial white and chocolate. The first card uses a small tree decorated with cranberry brads. Another fun product I have been hoarding is the self adhesive linen. You can fray the edges and even stamp on it. What a cool product, I'm glad to finally use it.
These next cards use the twilight snowflakes. You simply punch them out, use glue dots to place them on your card and finish them with a beautiful pearl.
Labels:
christmas cards,
felt snowflakes,
felt trees,
mistletoe
Thursday, December 2, 2010
Sweet Time...
...spent with my mom. I was fortunate to have my mother here with me for the last couple of weeks. One night her and I sat down to create her Christmas cards. I asked her to choose a design, a sentiment and asked her what colors she liked. You can see by her paper choice where I get my traditional taste from. Her and I created a total of 20 cards in just an evening.

To reward ourselves for all of our hard work we made a festive dessert. I baked up some death by chocolate cookies and then my mom sandwiched some delicious peppermint ice cream in the middle. So yummy, and the kids love them!

To reward ourselves for all of our hard work we made a festive dessert. I baked up some death by chocolate cookies and then my mom sandwiched some delicious peppermint ice cream in the middle. So yummy, and the kids love them!
Monday, November 29, 2010
Oh! Christmas Tree
Time to shift gears, Christmas is practically here! We filled our bellies with turkey and then decorated our home with Christmas decor. I have been wanting to try one of these Styrofoam cone paper trees. I did mine with the new Mistletoe papers and some older Christmas papers too. I created the topper of the tree to be viewed from either side so each is a different color and has a different stamp on it.
This weekend is my big Christmas card exchange so I will post some "goodies" this week and will have a big post with everyones Christmas cards soon.

This weekend is my big Christmas card exchange so I will post some "goodies" this week and will have a big post with everyones Christmas cards soon.
Wednesday, November 10, 2010
Mickey & Mistletoe
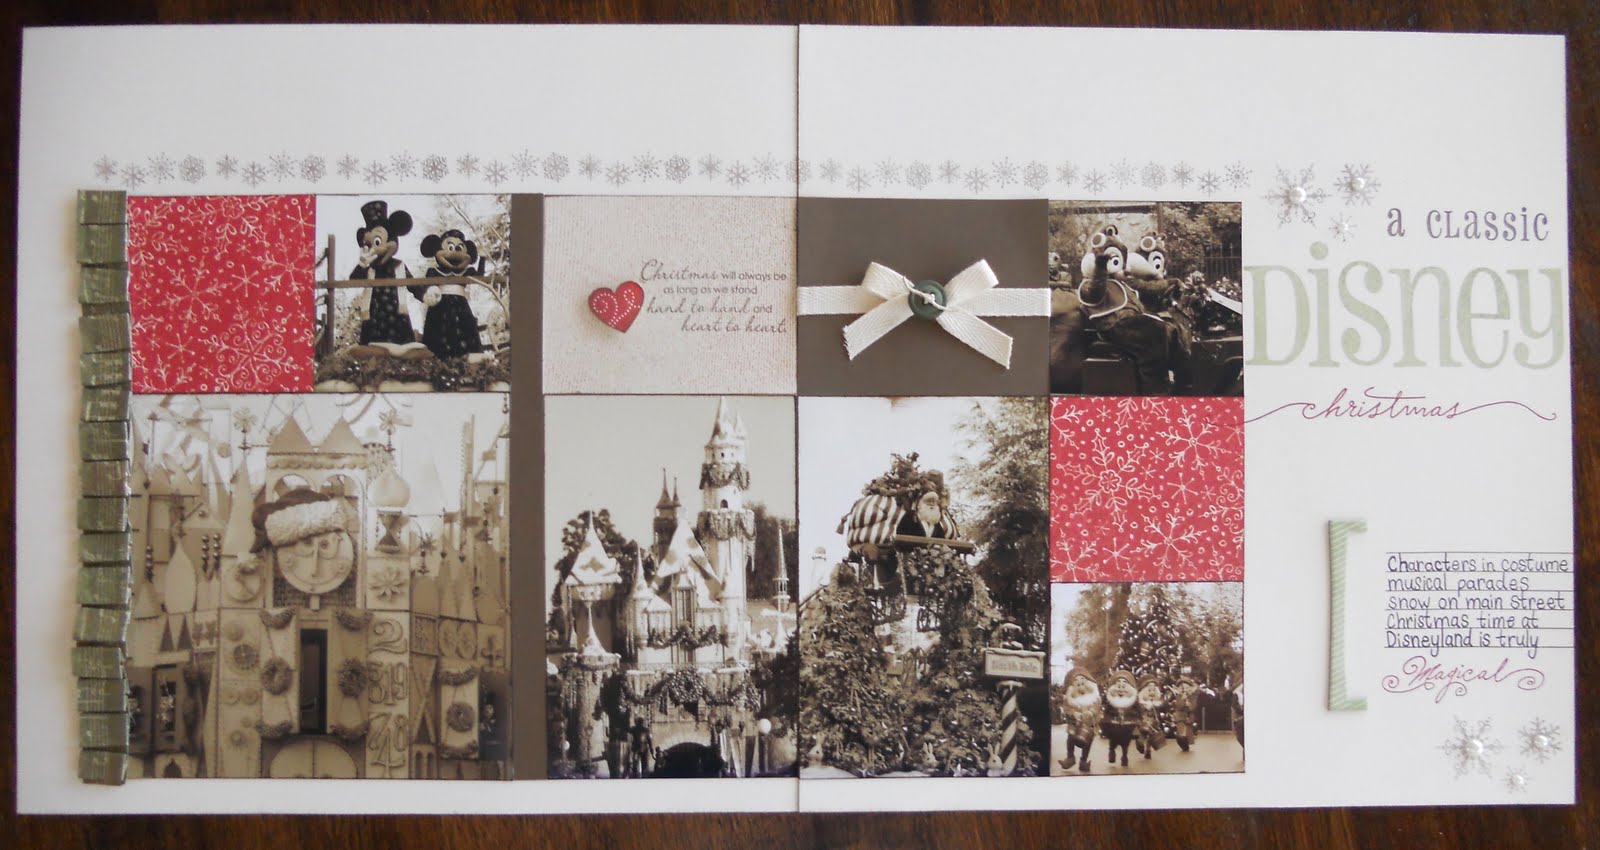
I scrapped these pages from our December/January trip to Disneyland earlier this year. The park was absolutely magical and I wanted to capture that in my layout. By using the Mistletoe papers and printing the photo's in sepia tone it gave my pages this wonderful nostalgic appearance. The design has lots of fun embellishments, but the colonial white spaces also gives your eye a place to rest. I will enjoy looking back at these pages for many years to come!

Monday, November 8, 2010
Mix-N-Mingle Joy
This is a wall hanging that my club members will be making later this month. It uses some of the pieces of the new Mix-N-Mingle album. I also used the new stamp St. Nick and the fabulous Mistletoe Christmas papers. It is a really versatile product and I can't wait to create more projects with the pieces!

Labels:
joy wall hanging,
mistletoe,
mix-n-mingle,
st. nick
Tuesday, October 19, 2010
H2H Embossing Challenge
I could not "resist" the challenge on the Heart2Heart Blog this week. It's all about embossing. Dry embossing or heat embossing. I chose a heat embossing with a resist technique and lots of layers.
This first card features an older, but favorite stamp set, Vintage Christmas. The first layer is some Christmas text done in Desert Sand. I then used a clear stamp pad and clear embossing powder for the mistletoe image. Once heated and cooled I sponged over the top with Cranberry, New England Ivy and Olive ink. The card was finished off according to a template in the Wishes book called Lower Layers. {I flipped the template as you can see, because my layers are not 'low'}


This card was done the same way, just with different stamps and a frosty blue color combo. Don't you just love this little Polar Bear?
This first card features an older, but favorite stamp set, Vintage Christmas. The first layer is some Christmas text done in Desert Sand. I then used a clear stamp pad and clear embossing powder for the mistletoe image. Once heated and cooled I sponged over the top with Cranberry, New England Ivy and Olive ink. The card was finished off according to a template in the Wishes book called Lower Layers. {I flipped the template as you can see, because my layers are not 'low'}
This card was done the same way, just with different stamps and a frosty blue color combo. Don't you just love this little Polar Bear?
Labels:
christmas cards,
embossing,
mistletoe,
polar bear
Subscribe to:
Posts (Atom)