Monday, December 6, 2010

Christmas Card Exchange 2010

As promised here are pics of all the Christmas cards that were exchanged this past Saturday. Some of these women have participated with me in past years while some are brand new. Their creations are always amazing and each idea is so different.

Pat~ I love shapely cards! Her ornament is beautiful and the snowflake paper from Mistletoe is one of my favorites this year!


Nikki~ Her sweet little Christmas tree card is just as fun and sparkly as her personality!
Allison~ Look at this cute gang of characters! Lots of detail and I love the pop of blue.

Tommie~ A hedgehog never looked cuter. I'd say he's ready for the Holidays!


Peggy~ Always elegant! The photo simply does not do this card justice. The holly leaves, words and ornament are all embossed and the entire red snowflake paper in the background is covered in a prisma glitter!


Stacie~ Simple clean lines is her style. These presents are perfectly packaged. My fave detail is the tiny tree tag on top.

Janet~ Fancy folding and elegant embossing makes this card gorgeous. Check the next photo for a peek inside.


Julie~ A glittery blue snowflake really pops on a black background. Some embossed flourishes and bling finish her card beautifully.

Finally, here is my own card that was made to exchange, but is also a personal gift to each of these ladies. Through television and email advertising I caught on to a trend of purple and red together. I'm not normally a big fan of purple, but it seemed to be everywhere this season. Organdy ribbon, cream lace and damask embossing added an elegance to this card. The Santa also added a bit of vintage appeal.

My gift is what was on the "inside". For each of the gals I burned a CD of some of my favorite Christmas songs. Old classics like Crosby and Sinatra, to fun favorites I sing with my kids like Mr. Grinch and the Chipmunks Christmas song! Each disk was tucked safely inside a pocket.

A clever gift idea no doubt, but I wanted to provide them a CD jacket to keep their disc safe all year long. I decorated the inside cover and provided them with a list of all the tracks.


Everyone did an amazing job and it was fun to get together. The ideas are all so unique and truly inspired me, I hope they inspire you too! I will post the ornaments we exchanged next, talk about inspiration!!
{Thank you ladies for all your hard work and sharing your talent.}

Sunday, December 5, 2010

Christmas Event

Look at all of these Fabulous Christmas cards!


Yesterday was my Christmas card exchange and club event! There was a total of 9 cards exchanged and each was unique and beautiful. I will show close ups of each card this week.

We also had a secret Christmas ornament exchange. Ornaments could be made from any medium the artist desired and each was a different and fun idea. I will also show them in a future post very soon!

Ladies were welcome to bring a goodie to share before sitting down to create our December Back to Basics pages that I posted on Friday. These gals always go above and beyond, here's a list of the treats:

* Ham and sweet dill roll ups
* Artichoke spinach dip
* Graham cracker and chocolate chip dip
* Spicy saltines with a cool ranch dip
* Peanut clusters
* Chocolate cupcakes
* Pumpkin chocolate chip bread
* Cheesecake and chocolate chip cookie bites

As you can see, we had lots of goodies to munch on!


Here is the treat that I made to share: Elf Food!


These baking cups were filled with all of the Elves favorite treats:
* Chocolate covered pretzels {Flipz}
* Frosted cheerios
* Mini marshmallows
* Yogurt covered raisins
* Yogurt covered pretzels
* White candy coated M&M's

{toasted marshmallow jelly beans can also be added, but I was not able to find any in my small town stores!}

Friday, December 3, 2010

December Back 2 Basics

I can hardly believe that it's December and my Back 2 Basics Club has come to their final pages. We will be creating our Christmas pages this Saturday after we exchange our Christmas cards. I used the new Share the Magic stamp from the October Stamp of the Month. I also pulled out some older Jingle papers which makes the pages fun and adds a touch of whimsy to the Santa and Snowman characters. Speaking of Santa and Mr. Snowman you have to check out the close ups below to see the blinging snow and twinkling fur coat! How rewarding it will be to add these pages to a complete album. Whether they are keeping the albums for themselves of giving them as a gift, what a treasure they will be!


Thursday, December 2, 2010

Sweet Time...

...spent with my mom. I was fortunate to have my mother here with me for the last couple of weeks. One night her and I sat down to create her Christmas cards. I asked her to choose a design, a sentiment and asked her what colors she liked. You can see by her paper choice where I get my traditional taste from. Her and I created a total of 20 cards in just an evening.


To reward ourselves for all of our hard work we made a festive dessert. I baked up some death by chocolate cookies and then my mom sandwiched some delicious peppermint ice cream in the middle. So yummy, and the kids love them!


Tuesday, November 30, 2010

H2H Sketch Challenge

Playing along with the Heart 2 Heart challenge this week. It's a sketch challenge and I wanted to create some ideas for Christmas. I used the reverse side of some Caboodle paper for the background. I thought the soft tones of creme brulee and cocoa complimented the juniper plaid nicely. Check out the sketch and the design teams creations on the Heart 2 Heart blog.


Monday, November 29, 2010

Oh! Christmas Tree

Time to shift gears, Christmas is practically here! We filled our bellies with turkey and then decorated our home with Christmas decor. I have been wanting to try one of these Styrofoam cone paper trees. I did mine with the new Mistletoe papers and some older Christmas papers too. I created the topper of the tree to be viewed from either side so each is a different color and has a different stamp on it.

This weekend is my big Christmas card exchange so I will post some "goodies" this week and will have a big post with everyones Christmas cards soon.


Friday, November 19, 2010

More Goodies!

Here are some more goodies I made for the schools leadership group. The kids celebrate their birthdays with a pizza lunch and get to decorate their own cupcakes. I have provided little treats for them for 3 years now. It's not anything big, but the kids appreciate them and it makes them feel special for the day!


Tuesday, November 16, 2010

Bake Sale Beauties

It's been almost a week since I posted last...yikes! I have been completely and totally focused on our annual Chili Cook Off. My husband and I put together a cook off over a year ago to raise money for our church. They asked us to do it again this year and want to make it an annual event. I met with a small committee this year to plan it and the response was greater than the last time. We had 25 participants that cooked some amazing chili's. Those attending were also able to purchase chili dogs, soda's and baked goods. Since I don't cook any chili for the event I made up lots of goodies for the bake sale. Here are a few items I created, and yes they all sold out!!

Here are my No Fire S'mores kits. Easy to put together and super fun for families to make at home together later!


My delicious toffee bars in a semi-sweet and milk chocolate.


Chewy Chocolate Drops are my sister's favorites. They are almost like a truffle finished off with a chocolate ganache. I created small cardstock boxes for them to sit inside then wrapped them in a cello bag. I finished them off with a label and ribbon.


Finally, some chewy chocolate peanut butter cookies. Would you believe you make these with a devils food cake mix? So moist and yummy!


There is something about package presentation that draws a buyer in and using CTMH stamps and products sure makes it easy. Remember there not just for scrapbooks and cards!

Wednesday, November 10, 2010

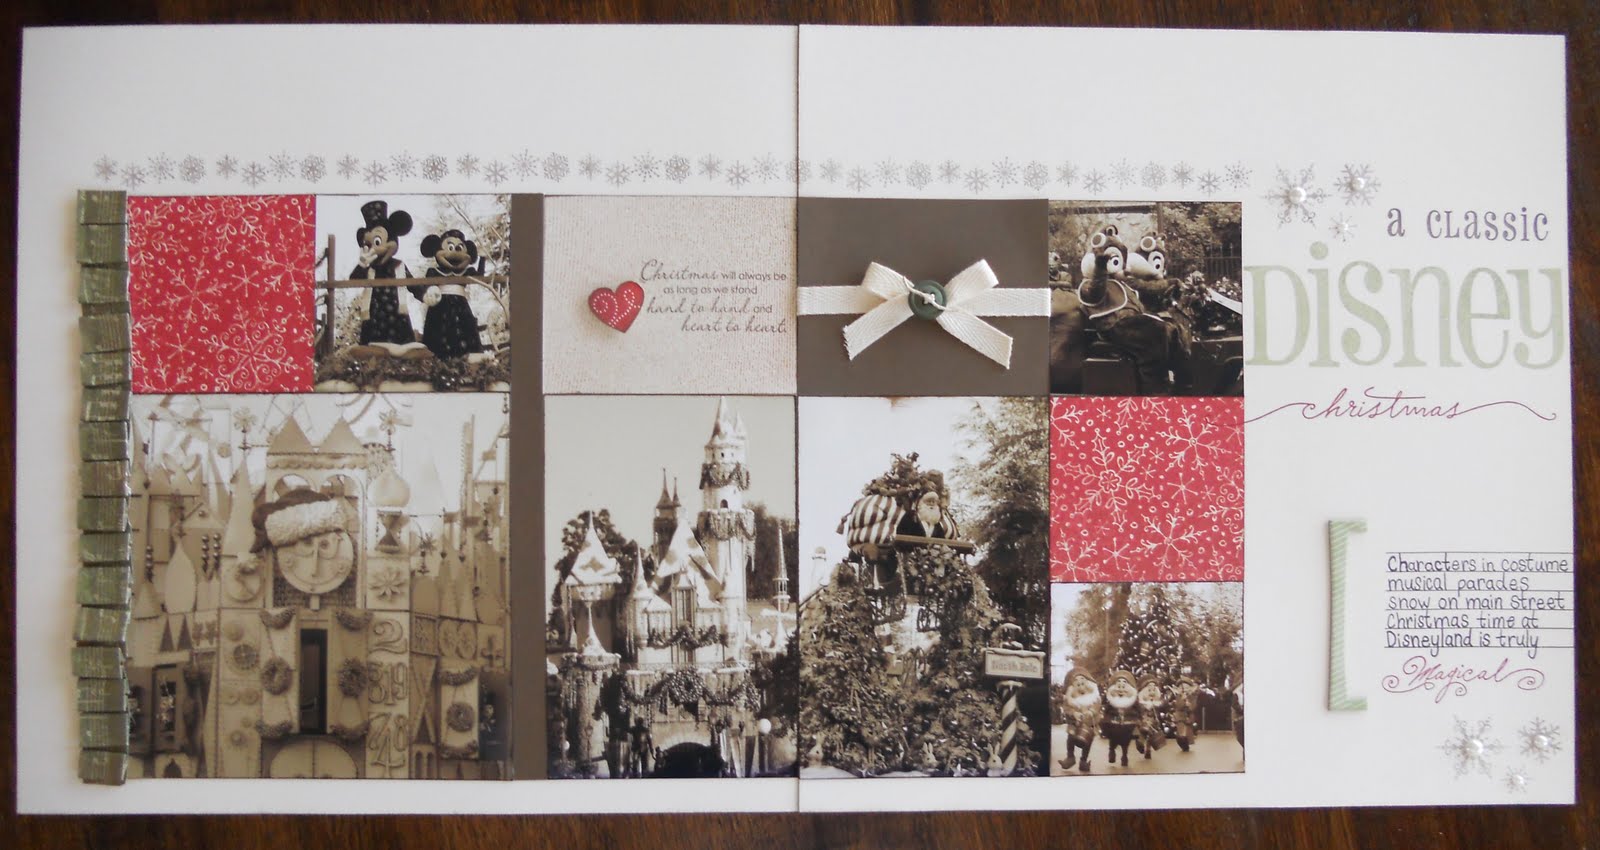
Mickey & Mistletoe

I scrapped these pages from our December/January trip to Disneyland earlier this year. The park was absolutely magical and I wanted to capture that in my layout. By using the Mistletoe papers and printing the photo's in sepia tone it gave my pages this wonderful nostalgic appearance. The design has lots of fun embellishments, but the colonial white spaces also gives your eye a place to rest. I will enjoy looking back at these pages for many years to come!


Tuesday, November 9, 2010

H2H is out of SHAPE!

What a fun idea to create a card that is not your typical square or rectangular shape. The design team over at Heart 2 Heart challenges blog has come up with circles, stockings, birds and even coffee cups! Such great ideas out there, so very inspiring.


I will be making my sisters favorite cookies this weekend for her visit and thought about giving her the recipe too. Using the challenge on H2H here is my very sweet apron recipe card holder.

Monday, November 8, 2010

Mix-N-Mingle Joy

This is a wall hanging that my club members will be making later this month. It uses some of the pieces of the new Mix-N-Mingle album. I also used the new stamp St. Nick and the fabulous Mistletoe Christmas papers. It is a really versatile product and I can't wait to create more projects with the pieces!


Saturday, November 6, 2010

H2H Color Challenge ~ Welcome

It's a color challenge on Heart 2 Heart this week. The Design Team have created some truly gorgeous artwork this week, you really must go check it out! Before you do though here is a simple card I created with the color combo.


Wednesday, November 3, 2010

Last Call for Halloween!

I know, I know, it's already November, but I had to share this last Halloween pic! Last month I posted all sorts of Halloween decor items for your scrapbooking and your home. So how do you decorate at the sand dunes.... Rrrrr show you mates! Ha, Ha, Ha! We celebrated the holiday at the dunes where the children trick-or-treat from campsite to campsite. This was the theme I came up with for our family, I love sandy pirates!


Friday, October 29, 2010

Frightful Friday ~ Spooky Cards

For my last Frightful Friday post I have some spooky cards for you. I used some newer Halloween stamps, but mixed them with an older patterned paper. They also contain some of my favorite embellishments and styles out there right now. I incorporated glitter, bling, ruffled papers and ribbon, lollipop flowers and something different...wispy webs! I hope you love them as much as I do!


Need more Halloween inspiration? See all the clever creations on the Heart 2 Heart Blog this week!

Thursday, October 28, 2010

Fun Halloween Decor

I love to bring out all of my Halloween decor at the beginning of the month. My kids will help me decorate the house, but usually get distracted by some of the toys we've had for many years and reminisce. I found some new goodies this year and also created some of my own decorations.

This first idea is something that the kids can help with. The idea came from the first grade teacher next door. She had a print out of a spider web on a piece of paper and attached a sheet of wax paper over it. The children then trace the web with regular Elmer's glue. Let it dry completely and then peel it from the wax paper. Add a spider and use tiny glue dots in the corners to attach it to the window, corner of a niche or picture frame to make it haunted!


Here is one of my new finds. I don't live near a Tai Pan Trading store and that's probably a good thing. On one of our summer travels I found this frame with a jack-o-lantern on it. I placed a row of tea light candles just in front of it to capture light on his face. So cool!


Something new I created to greet visitors this year is a spooky jack-o-lantern tree. What an easy and practically free project. I grabbed some dead branches from the back yard and spray painted them black. I stuck them in a flower pot, weaved spider webs all over and hung some old tin lanterns on the branches that I've had for a few years now.


Here is another fun find from Tai Pan Trading. It did not originally have the glass vase in the center. I added it to hold candy at first, but once the kids devoured that I filled it with some creepy eyeballs. It looks really great at night with all the candles lit!

I hope you enjoyed some of my Halloween home decor. Tomorrow is the last day for Frightful Friday, so come back for more spooks!