

Back to Basics Club in April couldn't be easier! The pages are simple and clean. They require minimal cardstock and papers. The only stamping required is the month title and a simple sentiment from the Month of June stamp. Embellishments are 1/2 purchased and 1/2 handmade. Chocolate ribbon and Colonial White Brads are your purchased embellishes and the flower is totally handmade and really easy.
Here are the pages side by side ~ {the sentiment on the bottom of the right page says: Not a Care in the World}

To make the flower you only need to cut 4 circles of varied sizes and then trim with scallop scissors. You will then fold them in half and then in quarters. Now open them again, pinch in the middle and scrunch them up a bit. Layer them on top of one another and secure with a brad.

Here are some other ways to create paper flowers. The directions for this technique are illustrated in the new Summer Idea Book. Just like the other paper flower they are simple and quick to make. Scroll down for more info.


How to make circle punched paper flowers:
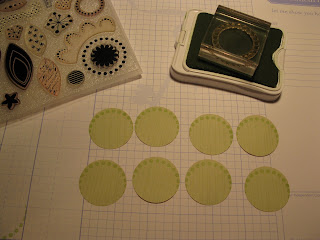
1. Punch 9 circles of the same size, you can use any size punch, I believe mine is 1 1/4". I then stamped a border image on 8 of the circles (you will use the 9th circle as the base of the flower).
2. Then fold in two of the sides towards the center, overlapping the edges.

3. Adhere the points of the folded circles onto the 9th remaining circle.

4. Finish the center of the flower with a button or brad and attach to your project.

I hope you'll try some of these flower techniques. They are super simple and really add that WOW to your project!!
No comments:
Post a Comment